From gel to chisel

Our four noble gentlemen did not receive a standard treatment. Judy De Roy, Claudia Aerts and Sam Huysmans applied new techniques to clean the busts — and to give one of them a brand‑new little finger. We asked Judy De Roy, head of the Stone Sculpture Studio, to tell us more.
To be restored
- Luis de Benavides Carrillo, Marquis of Caracena, by Artus Quellinus I, 1665
- The Spanish King Philip V, by Jan Pieter Baurscheit I, 1700
- Maximilian II Emanuel, Elector of Bavaria, by Willem Kerricx, 1694
- Juan Domingo de Zúñiga y Fonseca, by Lodewijk Willemsens, 1675
Carried out by
- Department of Conservation & Restoration of the KIK, Stone Sculpture Studio, Judy De Roy, Claudia Aerts and Sam Huysmans
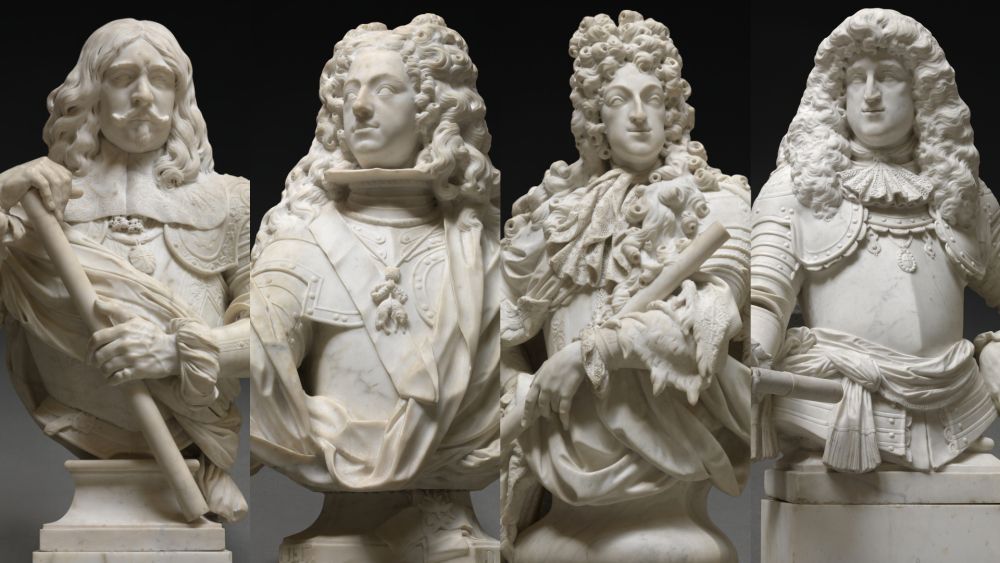
The four busts side by side
You restored four sculptures at the same time. Does that offer advantages, or does it only make the challenge greater?
Judy De Roy: “It’s certainly exciting, especially because the quality of the works is so high. That makes the restoration an even more rewarding challenge.
In consultation with the KMSKA, we chose to treat the four sculptures simultaneously, because they will be displayed together in the museum, even though they were not originally conceived as a group. This way, we can fully coordinate the degree of cleaning and the overall treatment across all four pieces. With white marble in particular, you can only really compare the level of cleaning when the sculptures are placed side by side. Relying on memory or photographs makes it very difficult to achieve the same result.”
Do you often restore portrait busts like these?
Judy De Roy: “There are very few ensembles of this kind, so we rarely encounter a complete group of busts like this. But of course, we work with marble quite often. A few years ago, for example, we restored The Human Passions relief by Jef Lambeaux. That work, like these busts, is carved entirely from Italian Carrara marble.”
Can you build on previous experiences?
Judy De Roy: “Yes and no. Every experience counts, of course. But there is no standard treatment for marble. Sometimes a piece has a finishing layer or a layer of paint. Or the marble shows stains we’ve never encountered before. A sculpture that has spent time outdoors presents very different issues from one that has always been indoors. That makes every restoration unique and fascinating — and the same goes for all materials.”
How do you begin a job like this?
Judy De Roy: “After an extensive study of the damage, we start with cleaning tests. For the first time, we worked with a rigid gel based on agar‑agar (also simply called agar). Last year, we deepened our knowledge of this method during a workshop. The tests produced good results on these busts, which allowed us to put what we learned into practice. Agar is a natural product. It is extracted from the cell walls of certain red algae found in Sri Lanka, Java and Japan. In the food industry, it can be used as a substitute for gelatin or as a thickening agent.”
What makes cleaning with agar different?
Judy De Roy: “The gel traps the water we use and ensures that its action remains limited to the surface. The water hardly penetrates the marble at all. When applied correctly, the gel is therefore harmless to the artwork.
You apply the gel warm, each time to an area of about 15 cm², and wait until it begins to set. Then you can peel it off. The final result is a homogeneous surface across the entire sculpture. It’s a pleasant way of working, and it worked beautifully on these busts. Of course, we can’t guarantee that this technique will be equally effective on other sculptures.”

Cleaning with agar - © KIK-IRPA, Brussels

Were the sculptures clean after that first step?
Judy De Roy: “The gel ensured an even level of cleaning across all four sculptures. But… elements such as the lace collar of Luis de Benavides were made using tiny drilled holes. We cleaned those holes afterwards with cotton swabs and water. Dirt trapped in all those details creates harsh contrasts. By removing the grime, the lace regains its lightness.”
Did the sculptures share common problems?
Judy De Roy: “Yes, they did. All four busts showed similar types of surface dirt and discoloration. They also had comparable small damages and old restorations that needed to be reassessed. But each sculpture still had its own specific issues — different kinds of stains, varying degrees of weathering, or unique fragile details. So while there were shared challenges, every bust still required its own tailored approach.”
But the sculptures also had different kinds of stains. How do you treat those?
Judy De Roy: “Because the sculptures are heavy, they were usually not moved when a room was being redecorated. As a result, Maximilian II Emanuel showed small varnish‑like spots, probably caused by a careless painter who was a bit too generous with his varnish. After extensive testing, we were able to remove those stains with acetone. Other stains received their own specific treatment in the same way. This gave the busts a more even appearance.”
Are there also stains you choose not to remove?
Judy De Roy: “Marble sometimes contains natural impurities. In the hair of Maximilian II Emanuel, for example, there was pyrite, a dark grey mineral. We leave those little ‘imperfections’ untouched because they enhance the beauty of the marble.”

Back sides of the busts of Maximilian II Emanuel with plaster additions. - © KIK-IRPA, Brussels

Back sides of the busts of Luis de Benavides with plaster additions. - © KIK-IRPA, Brussels

The plaster had been poured over an existing motif on the bust of Luis de Benavides. - © KIK-IRPA, Brussels
Maximilian II Emanuel and Luis de Benavides once received a plaster addition on the back. Why and when was the plaster added?
Judy De Roy: “It’s impossible to determine exactly when the plaster was added — possibly around the mid‑19th century. In 1863, the Royal Museums of Fine Arts of Belgium (KMSKB) commissioned plaster copies of the busts of Maximilian II Emanuel and Luis de Benavides. The additions are already present on those casts. So the plaster may have been applied specifically for the purpose of making the copies. Or it may have been added even earlier, to make the sculptures look more like a coherent ensemble. After all, the busts of Juan Domingo de Zúñiga y Fonseca and Philip V are finished at the back.
What is certain is that the additions are not original. On the bust of Luis de Benavides, the plaster was even applied over an existing carved motif in the marble.”
The plaster is softer than marble, so we removed it using a hammer, chisel and scalpel. That approach gives us a lot of control. The plaster on these busts also detached quite easily. After chiselling, only a light cleaning with water was needed. Simple, but effective.
Why did you remove the plaster?
Judy De Roy: “The plaster was in poor condition. The fold at the back of the bust of Maximilian II Emanuel, for example, was of noticeably lower quality than the rest of the sculpture. It added nothing visually. Meanwhile, the original artists had carved the hard marble with extraordinary finesse — think of the lace details, which almost seem to flutter. After consulting with the KMSKA’s restoration team and the ‘topstukkenraad’ (which helps decide on the treatment of masterpieces such as Maximilian II Emanuel), we were given approval to remove the plaster.”
How did you go about removing the plaster?
Judy De Roy: “Plaster is softer than marble, so we removed it using a hammer, chisel and scalpel. That gives us a very controlled way of working. On these busts, the plaster also detached quite easily. After chiselling, only a light cleaning with water was needed. Simple, but effective.”
The sculptures were all missing small fragments, some of which you restored. But one bust, that of Juan Domingo de Zúñiga y Fonseca, had a more serious loss: his entire left little finger was gone. What did you do about that?
Judy De Roy: “The sculpture is otherwise intact, so the missing little finger was quite disruptive. In consultation with the KMSKA restoration team, the idea emerged to recreate the finger. That became a real possibility once we rediscovered the plaster copies at the KMSKB. There is, in fact, a cast of Juan Domingo de Zúñiga y Fonseca with the little finger still present. With permission from the Brussels museum, we were able to have 3D scans made of the plaster left hand. Without that plaster copy, we probably wouldn’t have reconstructed the finger — the only other reference was an old photograph, and that’s a very difficult starting point. Here, we had a physical example to work from.”
How did you get from a scan to a new little finger?
Judy De Roy: “It was a special process for us as well. Nio Agency made 3D scans of both the plaster hand and the marble version, mainly to compare them and to study the break surface where the finger had been lost. They then produced several digital models of the missing finger. Materialise printed five different versions of the finger, as well as a complete hand based on the plaster copy. That full hand was crucial as a reference to determine the correct position of the new finger. After that, it became a matter of testing which printed finger matched the break surface of the marble hand most precisely.”

© KIK-IRPA, Brussels

© KIK-IRPA, Brussels

© KIK-IRPA, Brussels

© KIK-IRPA, Brussels
But that wasn’t the final step.
Judy De Roy: “We can’t simply mount a 3D‑printed finger. The printed resin isn’t durable enough. So we used the best‑matching printed finger to create a mould. After several tests, we determined the ideal casting material. In the end, epoxy mixed with marble powder proved to be the closest match to the original marble. That allowed us to cast a new little finger in the correct colour and with the right sheen.”
Most visitors won’t notice the difference between the epoxy finger and the marble hand. Even experts will need to take a closer look to spot it.

The left hand of Juan Domingo de Zuniga y Fonseca - with the marble bust missing its little finger

with the plaster cast at the KMSKB

the restored hand with the newly made little finger
Are you satisfied with the result?
“Most visitors won’t notice the difference between the epoxy finger and the marble hand. Even experts will need to examine the sculpture more closely to see it. So yes, we’re very satisfied with the outcome. We do make additions from time to time, of course, but this particular technique was new to us. It’s definitely something we would use again, provided there is a model available as a reference. And now we can share this experience with other restorers as well.”
With thanks to…
The museum was able to carry out the restoration of these busts thanks to the financial support of the Baillet‑Latour Fund.


